Blog Archive
Table of contents
1. Overview
2. Create Content In Portal
2.1 Creating Folder
2.2 Creating URL iView
Add iview to Page
2.5 Creating WorkSet
2.6 Creating Role
2.7 Create User
2.8 Add Role to User
1. Overview
This document helps to perform the following activates
Create content in Portal (iView,Page,Role,Workset)
Create Users
Map Users to Roles
2. Create Content In Portal
You can create the following kinds of content in Portal
iViews
Pages
Worksets
Roles
iView can be assigned to Pages and page can be assigned to worksets and workset can be assigned to roles.
2.1 Creating Folder
1. In portal navigate to content Administration -> Portal Content
2. Right click on Portal content and choose New -> Folder
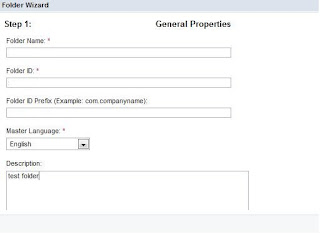
3. Enter a folder name, folder id, folder prefix, mast language and description for the folder, then choose finish.

2.2 Creating URL iView
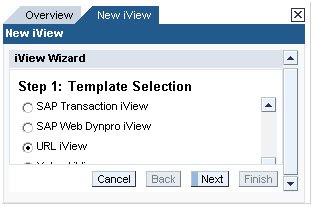
1. Right-click on the iViews folder and choose New → iView.
The iView Wizard appears.
2. Select URL iView, then choose Next.
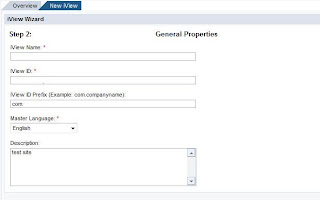
3. Enter the following values in the iView Wizard and then choose Next.
4. Enter the following URL. 
5. (optional) Choose Browse/Capture. Choose the Browse tab to preview a web site or navigate to the URL to be used as the content source for the iView. You can display the entire contents of the Web page or a portion of the Web page.
6. To display a portion of the Web page that you want to display in the iView, choose the Capture tab. Return to the iView Wizard screen and choose Next.
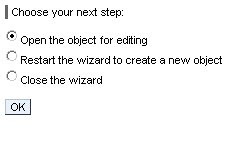
7. Select Open for editing when wizard completes, and choose Finish.
Choose Add.
8. In the Property Category dropdown, choose Appearance – Size.
9. In Height Type, select FULL_PAGE.
10. Choose Save.
2.4 Creating Page
After creating iview, it should be assigned to Page.
After you have created an iView, you need to assign the iView to a page.
1. Right-click on the Pages folder to choose New → Page.
2. Choose Next.
3. Enter values in the following fields and choose Next.
4. Select 1 Column (Full Width) and 2 Columns (Wide:Narrow), select the Add button. Choose Next.
The Summary page appears.
5. Choose Finish.
6. Choose Open the object for editing and then OK.
7. The Property Editor appears. In the Property Category dropdown, choose Appearance – Size.
8. In Height Type, select FULL_PAGE.
9. Choose Save.
Add iview to Page
3. Double-click the My Page page you created if it is not already open.
4. Right-click on webdynpro iView you created and choose Add iView to Page → Delta Link.
5. Choose Portal Content → Content Provided by SAP → End User Content → Standard Portal Users → iViews.
6. Right-click on any of the iViews (for example, com.sap.km.iviews → News) and choose Add iView to Page → Delta Link.
7. Choose Save.
8. In Display, use the dropdown to select Page Layout.
9. Choose Save.
2.5 Creating WorkSet
1. Right-click on the Worksets folder to choose New → Workset.
2. Enter the following values and choose Next.
3. In the Summary page, choose Finish.
4. Leave the radio button at the default Open the object for editing and choose OK
5. The Edit Workset iView appears.
6. Right-click on My Page you created and choose Add Page to Workset → Delta Link.
7. Select Navigation in the Property Category dropdown list.
8. Scroll down to the Entry Point property and select the Yes radio button.
9. Select Save.
2.6 Creating Role
1. Right-click on the Roles folder to choose New → Role.
2. Enter the following values and choose Next. alt=""id="BLOGGER_PHOTO_ID_5316941764576936674" />
3. In the Summary page, choose Finish.
4. Leave the radio button at the default Open the object for editing and choose OK
5. The Edit Role iView appears.
6. Right-click on My Workset, which you created, and choose Add Workset to Role → Delta Link.
2.7 Create User
1. Choose User Administration → Users → Create User
2. Enter values for the new user.
For our example, we use initial as the password.
2.8 Add Role to User
1. Navigate to User Administration Roles
SAP Enterprise Portal User Administration Roles
2. Enter the ID of the role you created (that is com.mycompany.myrole) in the search field
3. Select the Roles form the dropdown list
4. Select the Start button
The role you created will appear in the Roles table
5. Select the edit link in the row corresponding to your role
A new screen appears
6. Enter the user (i.e., newuser) you want to add to the role in the search field
7. Select User in the dropdown list
8. Select Start
Your user will appear in the table below
9. Check the checkbox corresponding to your user
10. Select the Add button
11. Select the Save button
The role is now added to the user.
this is one of the best thing you are doing rahul. A Big Grand Salute to you. keep it up.
BTW when are you posting Portal 102?
Regards
Paresh
patri said...
April 24, 2009 at 11:37 AM